Target Dummy Remix Challenge
About Remix Challenges
Welcome the Remix Challenges. We find an existing 3D file and generate a walkthough tutorial so you can recreate it yourself. All of our remixes are designed to be printed. We'll provide video and proof of the printed version.
Original Creator
Original Creator Info
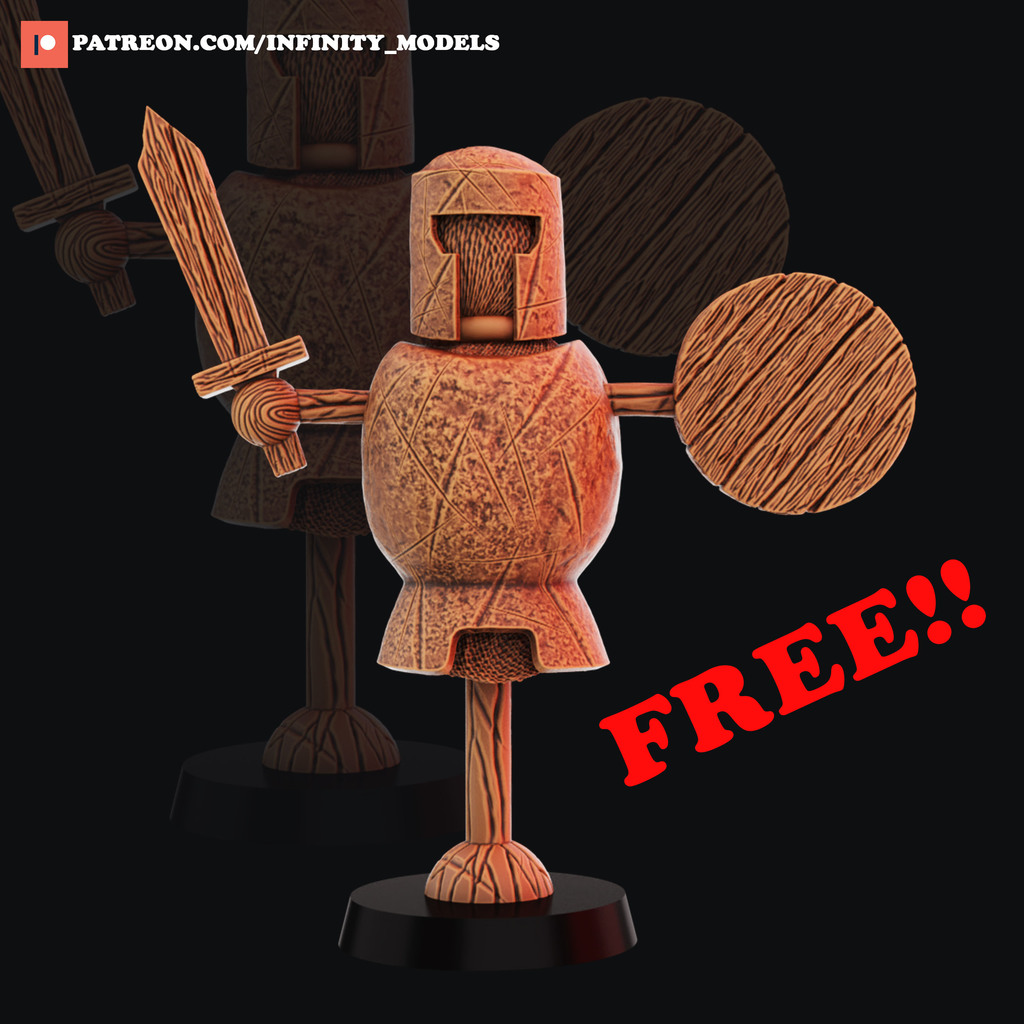
- Name: Target Dummy2
- Creator: InfityModels
- Date: March 11, 2022
- URL: https://www.thingiverse.com/thing:5294269
Video Walkthrough
Guided Tutorial
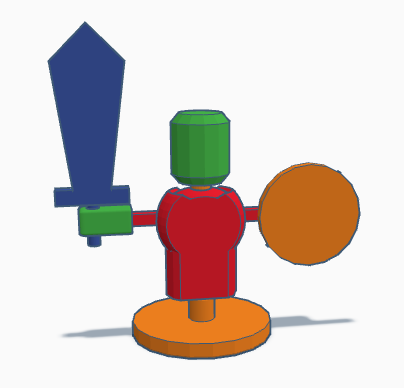
For this tutorial we will be making a Target Dummy using the TinkerCAD tool. We will print this a Sovol SV06 Plus 3D Printer.
- To begin, open a browser and go to TinkerCAD.com
- Login and create a new project. Name it: Target Dummy
-
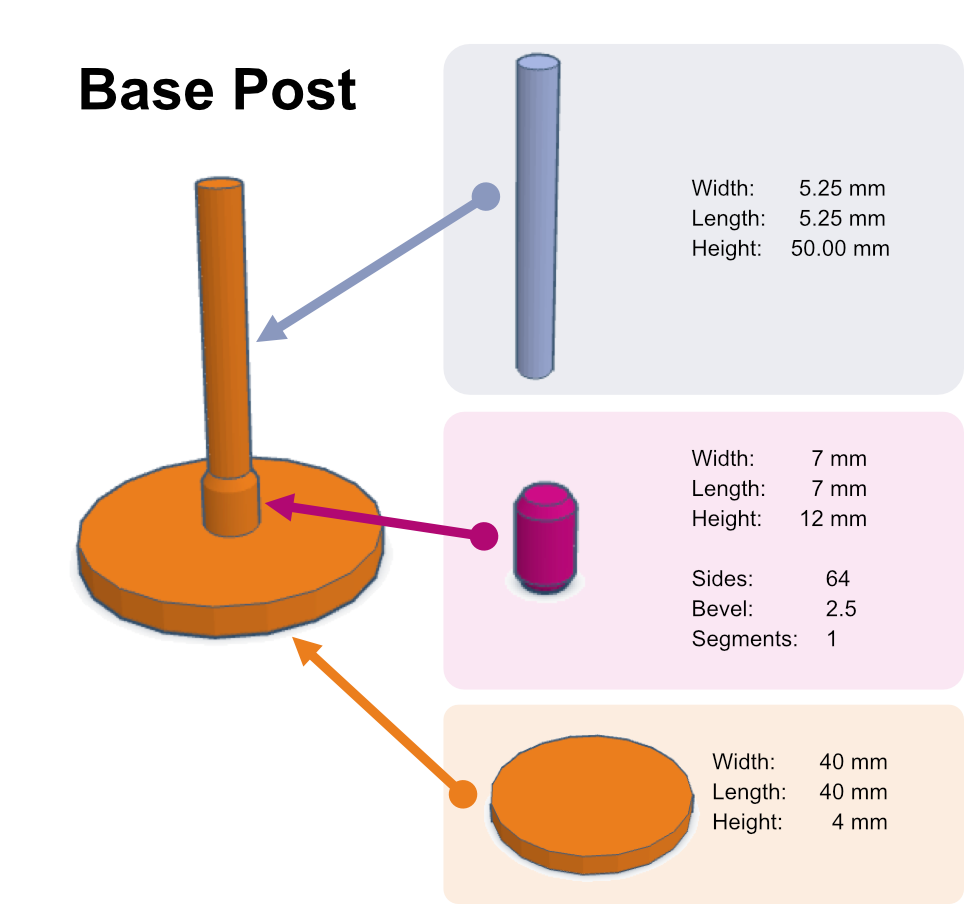
The step in the project is to create the base post that the Target Dummy will spin around when the shield is hit.
Base Post
-
These three parts are each created from a Cylinder.
-
Once they are each created and sized correctly, align them to the center and base of the large flat one. We'll call this the Base Cylinder
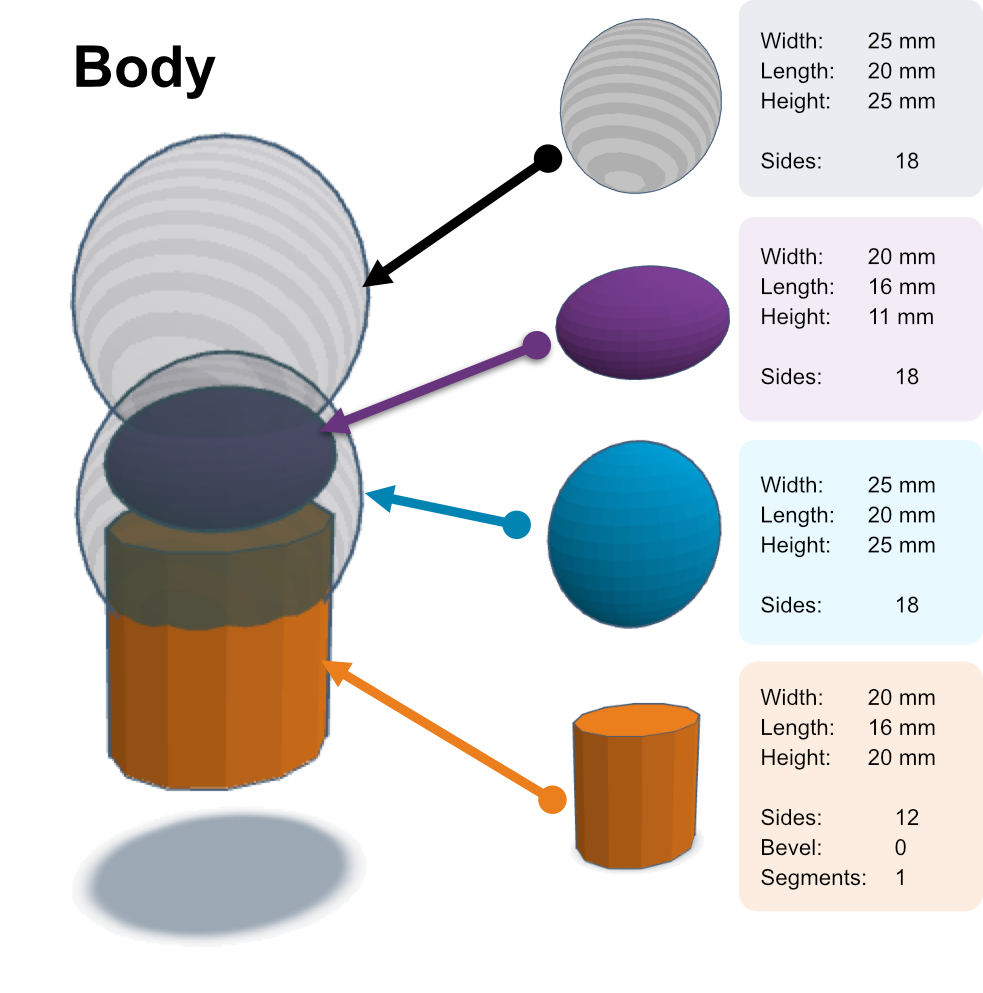
Body No Arms
-
With the base created our next step is creating the body that will pivot around the base.
-
The body unit is made up a cylinder and three spheres.
- To make the body we add in the cylinder, then align the sphere to make the frame.
- We then duplicate the sphere and create tiny version and change its color. I prefer to hide this for now.
- Once more we duplicate the sphere. However, this copy will be turned into a hole, and raised up.
- We then group the cylinder with both visible spheres to create the body frame.
-
Next we'll unhide the small sphere we created and raise it up towards the top of the frame but not all the way up. This will make it look like the body is inside and the outside is armor.
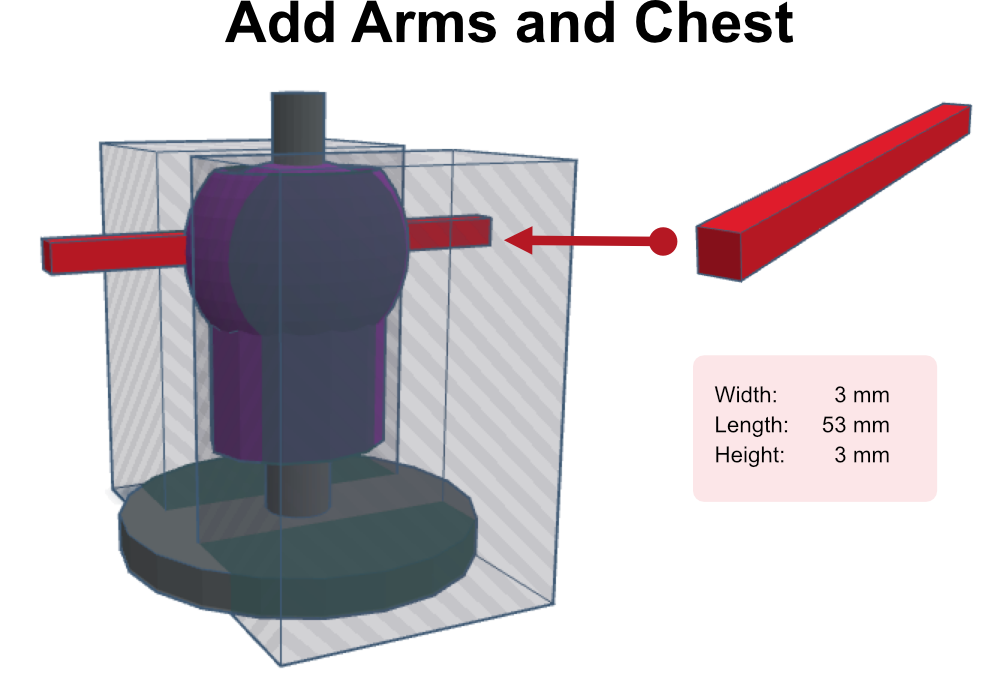
Add Arms and Chest
-
After creating the body we need add the arms and chest area. The chest area will make it easier to print the body.
-
Before we create the box, we will flatten the front and back of the body. This will make it possible and easier to print the body. This will also help us when we create the arms.
- Create Box and make it a hole. Then make the box big enough to cover the body.
- Place the Holed Box in front of the body and set it over the chest and into the cylnder bottom area a little bit.
- Duplicate this Holed Box and move it to the back. The body should contain a Holed Box on the Front and Back so that the front and back look exactly the same.
-
Now group the Holed Boxes and Body. Thereby creating a flat chest and back.
-
Now, Create the arms using a Box. Set the dimensions.
- Align the Rectangular Box to the back of the body and in the center to the body.
- Move the Rectangular Box up to the middle of the sphere so it looks like arms are coming out.
-
Do not group it yet. We need it to stay ungrouped so we can create the hands.
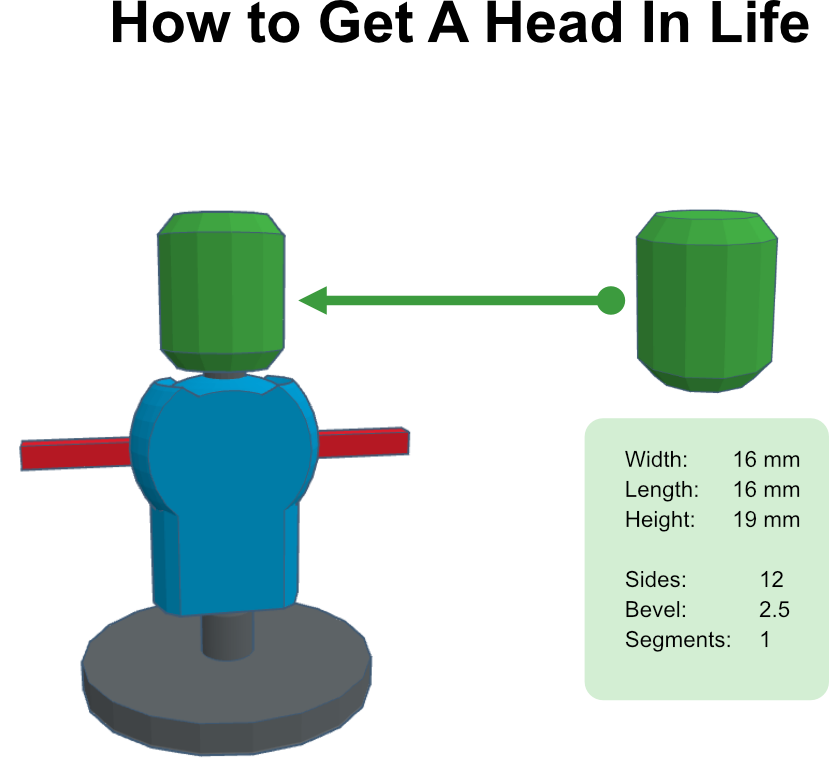
Make a Head
-
Before we create the hands let's add the head.
-
Set the given dimensions in the picture and align it to the top of the base post.
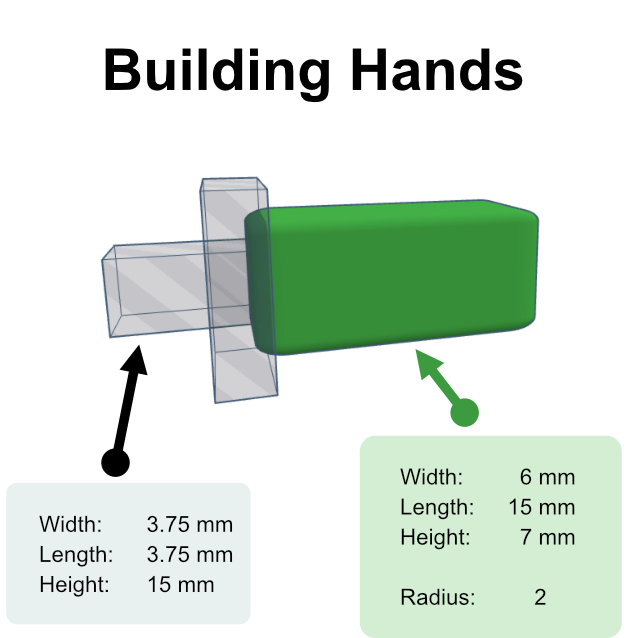
Create Hands
-
Creating the hands is one of the most difficult parts of this tutorial.
-
To make the hand, the easiet step is to duplicate the arms block and then scale it
15mmin from the right outwards. - Now, scale this new boxes width and height to
3.75mm x 3.75mm - Duplicate this box and set the new box dimensions to the size of the picture.
- Center align the new box to the smaller box and set the new box as hole so you can see all the objects.
- Set the bigger boxes radius to
2 - Move the smaller boxes end to the center of the larger box.
- Dupicate the smaller box again and this time make it large enough to cut off a small section of the hand. The desired effect is to make it flat on the side where the arm is inserted. - Watch the video
-
Now make the outer box solid and group the three boxes.
Make the Body and Head Spinnable
-
We've got our first hand. Our next step is to make it so the body and head can spin on the base post.

-
For the next couple of steps we are going to duplicate existing parts and ungroup others and then regroup.
- First dupicate the base unit with the post and then hide the duplicate.
- Select the original base unit and ungroup it.
- Delete the flat base and pill, leaving the long tall tube.
- Change the long tall tube to a hole and resise the tube to
6mm x 6mmand align it to the center of the head. - Group the body and arm rectangular block into one object
- Turn the body and head into holed texture so you can see the long tube.
- Scale the long tube so that it goes about
70%in the head and all that way through bottom of the body. - Duplicate the long tube, set the head to Solid and group the duplicate long tube and head, cutting out a tube section in the head.
- Change the body from holed to solid and select both the body and the other holed long tube and group them so that body has a hole going completly through it.
-
Unhide the base unit you hid earlier and temporarily make the body and head a holed type so you can see base post going through them.
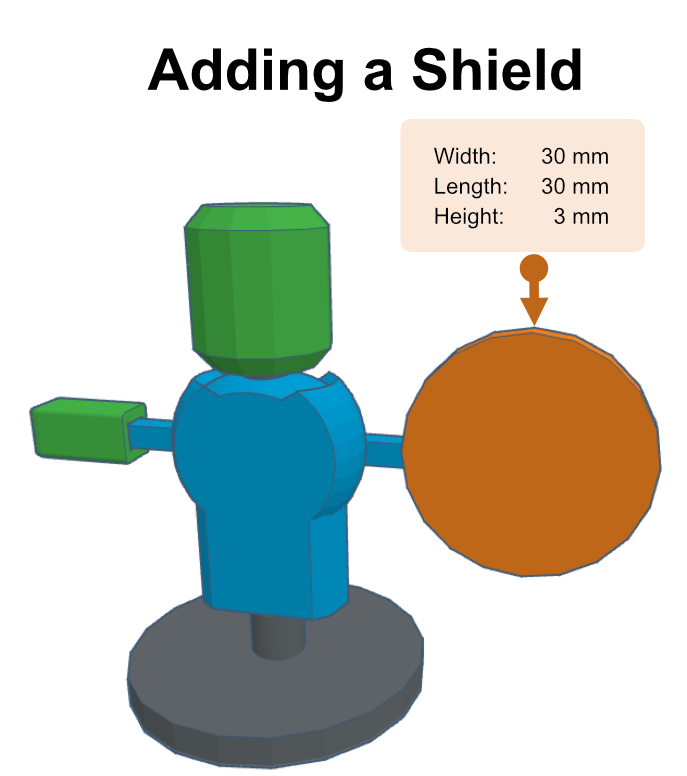
Duplicate Hand and Sheid
-
Before we create the shield let's duplicate the hand place it on the other end of the arm bar.
-
Now create a shield using a Cylinder.
- Set it to
30mm x 30mm x 3mm - Align it to the hand on the right. You could do this on the left but it doesn't matter because the hands are interchangable.
- Make it so the shield is up again the hand and then place it about
1mminto the hand. - Align the shield to the left of the hand than slightly move the shield to the left of the hand by a 2 to 3 mm.
-
Group the Hand and Shield together.
Create Sword
-
Finally, let's create the sword and insert into the hand. Unlike the shield, the sword will not be apart of the hand. Instead we'll make it so you can add anything to this hand.
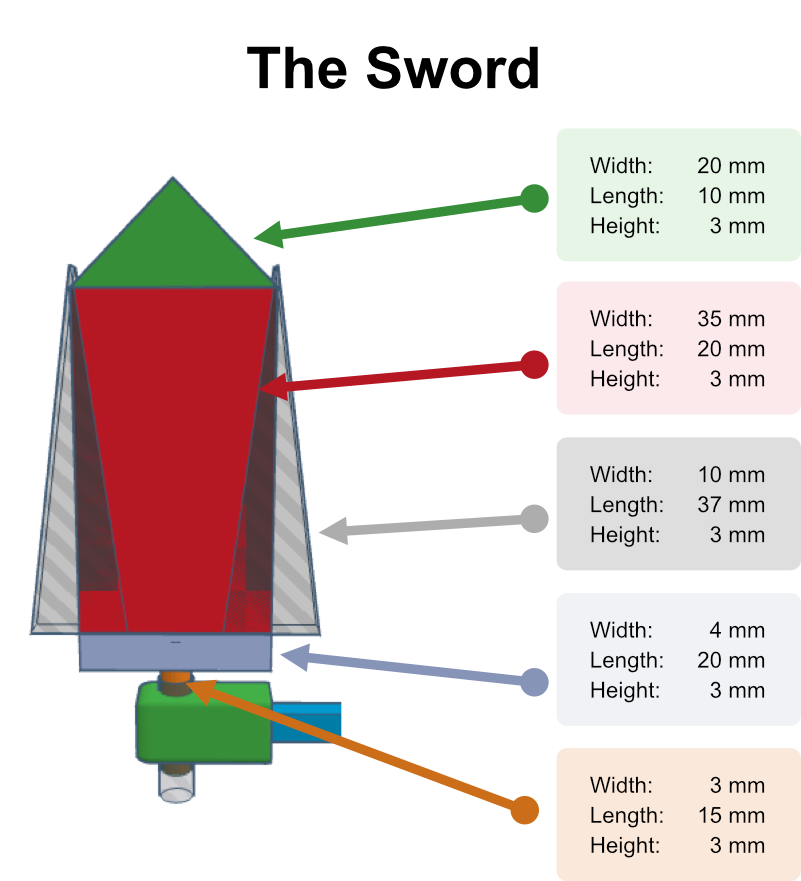
-
To create the sword, first add a
roofto the workplane and resize it to:20mm x 10mm x 3mm - Rotate it
90°degrees - Add a box to the workplace and resize it to:
35mm x 20mm x 3mm - Align it to the roof so they are touching
- Duplicate the box and scale in the reverse direction of the roof out
3mmfrom the blade. This will be the hilt. - Insert cylinder and resize it to:
3mm x 15mm x 3mmand align it to the hilt in the center and the top of the hilt. - Duplicate the roof, change it to a
holeand align it to the bottom of blade box. - Now move it right so the tip is inline with right-side of the blade box.
- Scale it upwards past the roof a little. It should extend over the roof a little as well.
- Duplicate this
holed roofand move it to the left side like it was mirrored. - Group all the objects to create a sword.
- Now rotate the sword
90°degress and align it to the left hand. - Make the left-hand temporarily holed so you can see where you a positioning the sword.
- Place the sword handle in the center on the left-hand and then move it further left so it doesn't overlap with the current hole in the hand where the arm goes.
- Ungroup the sword and duplicate the handle. Change the duplicate to hole and resize to:
3.5mm x 3.5mm. Make sure the it is vertically long enough to go through the hand. - Align it to the center of the handle.
- Group the
holedhandle and the hand to create hold in the hand for the sword to go. -
Group the objects of the sword to make it one object again.
You're finished. Way to go!!!
Now you just have send it to the printer. We used Ultimaker Cura with a Sovol SV07 Plus to print this for our example.